This is part two of a two part series covering the app creation process. You can read Creating iOS App Ranger Golf GPS: Part 1 here.

Key features of Ranger Golf GPS

Ranger was created with a single goal: to be the definitive GPS app for the driving range.

I wanted Ranger to be really good at one specific thing, instead of trying to be just OK at a bunch of things. To make sure that happens, Ranger users are presented with the GPS Target Screen right from the start. But, even though I wanted to focus on one task, I did want to provide some additional value. Ranger users can also see the relative wind direction (see below) and weather forecast, view how-to info, modify basic settings, and provide feedback directly from the app.

Hopefully, Ranger can continue to grow and add new features in a smart way, without degrading or complicating the core function of the app. I plan to be cautious adding new features, but still want to keep enhancing the app over time. To help prioritize new features, I’ve setup A UserVoice account and encourage Ranger Users to post and vote on feature requests. I like the idea of community-driven enhancements and other apps, such as Infinite Flight, are doing a great job of allowing the users to help drive future enhancements.

GPS TARGET SCREEN

Ranger Target

The primary function of Ranger is to provide accurate distances to any target on the driving range (or golf course) without a lot of taps, thought, or effort. To fulfill that promise, I decided to let the app fire up, ask for permission to find the user’s location, and then present the user’s position on top of the satellite view. In the beginning, I briefly considered leveraging a location DB like Foursquare, Yelp, Google, or others to show where the user was. But, quickly removed that feature because it would’ve complicated the development, cluttered the UI, and most importantly, provided limited benefit to users.

The main view controller contains the nav bar with 3 items: A lock button to lock your location (and save battery), the wind direction and speed (see below), and an info button that takes the user to the Help Screen and Settings.

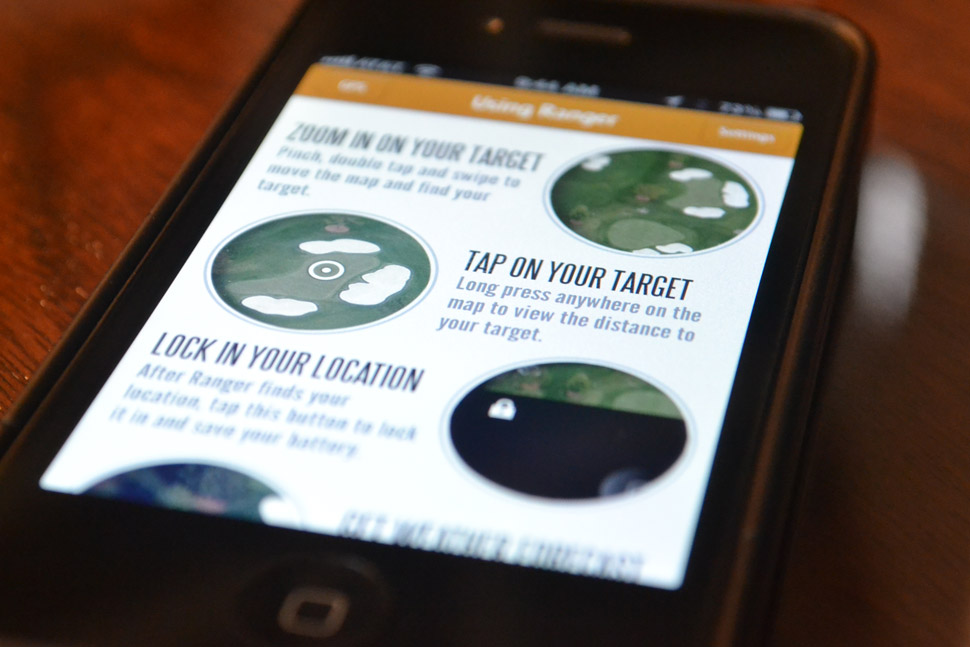
At the top of the view, the user sees a brief overlay with the 3-step process to get your distance: Zoom In, Press your Target, Hit Great Shots. This overlay automatically hides itself after a user taps the map. The main target distance is displayed in large type right in the center. I chose dark type on a light background so it would be easy to see outside. The rest of the screen is uncluttered allowing Ranger users to see the map below.

All a Ranger user has to do is long press anywhere on the screen to automatically see the distance. They can drag the target to a new location or simply long press somewhere else to change the distance. The new yardage is automatically calculated and displayed at the top of the screen.

Wind Direction Indicator

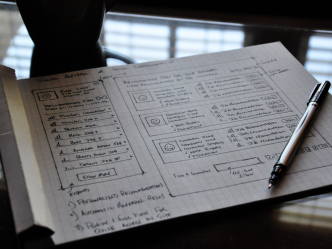
Ranger Wind Sketch

Wind direction and speed is a very important consideration for golfers on the course and the range. Every 10mph of wind roughly affects the total distance by one club length. So if a 10 mph wind is straight into a golfer’s face, a shot that would normally require a 7i will now require a 6i. This is really important when practicing so you can get an accurate idea of how far you’re hitting the ball.

I wanted to find a way to bring wind direction and speed into the app without complicating the experience. To do this, I decided to leverage weather data from forecast.io, determine the current wind direction at the user’s location, get the current heading from Location Services, and display the MPH and the relative direction of the wind. This was a fun process to figure out.

Just showing the wind direction – East 10MPH or NW 10 MPH – really isn’t useful if you don’t know the direction you’re facing. Ranger actually displays the relative wind based on the direction the user is facing and automatically alters the direction as they move. The most basic example is if the user is facing North and the wind is from the West, the wind direction arrow will be pointing to the right, indicating that the wind is blowing left to right. This is extremely valuable information and it was fun to work out the automatic animation/rotation of the wind indicator in response to a heading change notification. Just don’t use Ranger GPS in a USGA-sanctioned event!

WEATHER FORECAST

weatherscreen

I was originally interested in the Forecast.io weather API specifically for the wind direction feature. But the Forecast.io API is incredible and I wanted to find another legitimate reason to use the rest of the data. The data is insanely accurate, the API is solid, simple, and scalable, and the pricing structure is the best out there. The first 1,000 API calls per day are free and every 10k API calls after that cost just $1. Even though the API is straightforward, I leveraged a nice iOS library called ForecastKit to make the integration even easier.

I decided to create a Weather Forecast view. Instead of cluttering up the GPS Screen with another button, users can get to the the weather forecast by tapping on the wind indicator. The Weather view displays the current temperature, icon, and summary. Additionally, users can swipe through the weather icons for the next 9 hours. And since it’s important, the sunset time is also displayed.

I found a great set of beautiful and flat weather icons designed by Adam Whitcroft called Climcons.

HOW-To VIEW

How To Ranger

Ranger is a pretty simple app, but I wanted to include a hot-to section to make sure Ranger users wouldn’t be sitting there with the app wondering what to do. The design of the page is simple with limited text and an image highlighting key features.

Prior to launch, I assumed the majority of users would be in North America and Europe. But mostly USA. That turned out to be true, but I was surprised to see the app being used heavily in countries like Spain. Because the How-To view is one big image, localization won’t work. That means the help section of the site isn’t terribly useful if the user doesn’t speak english. In future updates, I’ll convert this to text and imagery to take advantage of localization.

Settings, App feedback and ideas

Ranger Settings
Since the app doesn’t require user login or many core features, the Settings View focuses on the distance measurement. Interestingly, the CLLocation class provides a method distanceFromLocation, which returns a distance between two points, but the distance returned is in meters. Ranger displays the target distance in yards by default, since that is the standard measurement in the United States, which required conversion. But, I wanted to make sure international users would find value, so users can change the measurement to meters or feet as well.

Since I decided to go all-in with this app, I wanted to give Ranger users a way to send feedback and get support. Any large-scale app would offer this functionality. I investigated a number of different feedback options including UserVoice, Apptentive, building my own, and others. Ultimately, I chose to go with a hybrid approach that would allow me to test out numerous services.

For in-app feedback, I chose Apptentive. They have a nice iOS SDK that is essentially drag and drop code. Specify a couple parameters and then trigger an overlay when a user taps feedback. With Apptentive, you can even allow screenshots to be attached. I looked at their ratings option, but had previously implemented iRate. That was a poor decision, as iRate has yet to trigger a Rating request. In the next update, I’ll be looking into why that is.

For the website, I wanted to offer a way to submit a feature request or support question. Uservoice seemed perfect. Their basic plan gives you a subdomain and the ability to customize aspects of the landing page. The support queue is easy to use, and Ranger users can submit and vote on feature requests. Right now, I haven’t brought in any Uservoice widgets into the getranger.com site, but I plan to. I do link to ranger.uservoice.com from the FAQ section of the site.

So far, I’ve had only one support question and one piece of feedback from the app, but both were actually positive comments and not support at all.

Beta testing with TestFlight

TestFlight is awesome. For anyone building an app, TestFlight should be the first service you sign up for after the Apple Dev Program. TestFlight makes it very easy to invite beta testers to try out your app. Instead of having to do all the provisioning, invites, and distribution on your own, TestFlight simplifies the process by handling the invite process, binary, and analytics.

TestFlight has an SDK making it very easy to receive analytics about the beta users. You can add checkpoints to know where your users travel and what they do in the app, you can see crash reports, session time, device information, and more. It’s simple for beta testers to get access to app updates and stay current as you continue through development. Can’t thank Ranger beta testers Chris, Andy, Mike, and Charlie enough for helping out.

ANALYTICS & APPROVAL PROCESS

Let’s start with the approval process. It took 5 total days. Prior to submitting the app for approval, I spent a lot time error checking, testing, and retesting the app in the iOS Simulator for non-retina, retina, and iPhone 5. I also tested on an iPhone 4S as well as continued to rely on beta tester feedback. I spent a lot of time reading the Apple App Store Review guidelines making sure I could check off every box. Once I submitted the app, I became obsessed with the status updates, which were very good from Apple and I watched http://reviewtimes.shinydevelopment.com/ to see the average review times, which proved to be spot on accurate.

I haven’t (and won’t) do any paid advertising to drive downloads, but I have done everything I can to optimize my App Store profile. From selecting the right keywords, to optimizing the title and first paragraph character lengths. I added screenshots for non-retina, retina and the 5 and all the individual app icon sizes recommended.

For analytics, I’m using Flurry. Originally, I wanted to continue to use TestFlight, with their new product FlightPlan. FlightPlan promised real-time app analytics and it would’ve allowed me to leverage the same checkpoints and code I used for the Beta Testing process. Unfortunately, FlightPlan was just launching and wasn’t producing the data I wanted during testing. I considered Google Analytics and Flurry. Either would’ve been good choices, but honestly, I wanted to try something new so I went with Flurry. Easy SDK to integrate and the same basic code as TestFlight to trigger sessions and events. The data isn’t in real-time, but I’m very impressed with the amount of data I have access to. And 300,000 other apps can’t all be making a mistake going with them.

Results so far

Ranger App Store
As for usage, I’m blown away. I really did create this app because a few of us hardcore golfers wanted it. If we were the only people who used it and got value from it, that would’ve been fine with me.

Since launching on May 25th, the app has been downloaded over 1,500 times in 39 different countries and all used in all 50 states. Ranger users have fired up the app over 8,000 times, spent over 150 hours in the app, and found distances to over 25,000 targets. Ranger is currently averaging over 30% active users, 2.8 sessions/ week and over 100 active users/day. The United States and UK have the most active users, with California and London providing the most active users in each country.

I didn’t anticipate the app being downloaded in so many countries and I didn’t spend much time worrying about localization. The app employs the basic localization, but in future updates, I will need to change the Help Screen from being a solid image, to being a text/image hybrid, which will allow the app to be much more multi-language friendly.

These results might seem sad to some developers, but this is truly just a fun side project and I couldn’t be happier with the results. This project gave me a reason to investigate many different products, experiment more with iOS, and ultimately saved me and few others from having to spend $250 on a laser rangefinder! It will be fun to see where Ranger Golf GPS goes from here.

A few people have asked about the app creation process so I decided to write a couple posts. This is post one of two. Part one covers the background info and part two covers the core features and results. You can read part 2 here >

WHY RANGER GOLF GPS WAS CREATED

Ranger Featured

The core group of guys I play with wanted a GPS app to use while practicing on the range. We wanted an app like this and I wanted to create it. Like a lot of golfers, I use a GPS app to provide accurate distances and keep my stats on the course. But these apps don’t allow you to get distances on the driving range, just golf courses that have been mapped. Also, driving ranges typically mark their distances to one spot, forcing you to guess the actual yardage to the targets. To get accurate distances on the range, you’d need to pay a couple hundred dollars for a laser rangefinder, but if you’re not going to use that on the course, what is the point.

Ranger was created with a single goal: to be the definitive GPS app for the driving range.

Ranger has been a really fun side project. I don’t consider myself a developer. I’m an interactive product guy that can dig in and code to get things done. I like the challenge. With Ranger, I could’ve simply created the app and used ad-hoc distribution to shoot it to a few friends, but once I decided to invest time in the app, I wanted to go all in. I wanted to build this app as if it was my primary job and I was going to build a business on the back of this app. This post is about the process of building and launching Ranger Golf GPS for iOS.

THE NAME, LOGO and iOS

The name and logo ended up being the easiest part of this process. I wanted to come up with a one-word name for the app (why go against conventional wisdom) and it only took a few minutes of brainstorming to decide ‘Ranger’ was the name. The play on both “driving range” and “range finder” was almost too obvious. I was surprised to find that there wasn’t a driving range (or GPS app) with that name already. There are a few other aps in the App Store that combine Ranger and GPS, including a set of Park Ranger apps, but I felt like the name was solid and went with it. Ranger.com was taken, but I snatched up rangerapp.com and eventually getranger.com, which became the final site URL.

I had two versions of the logo. The first was a mixture of an “R” and a target symbol, using the target as the round part of the “R.” But that didn’t look great and I moved on to the second and final option, combining a flagstick flag and an “r.” I sent it to a couple people who instantly liked it and I was done. The logo is at the top of this post.

The decision build Ranger for iOS over Android was an easy one. I’ll admit I’m a fanboy and the core group of guys I was building this for are all fanboys, too. But that aside, I likely would’ve chosen iOS anyway. Many large-scale app startups start with iOS. It is widely recognized that the iOS platform provides a more consistent experience and makes it easier to get the first app out the door. I’ve already had requests for an Android version – which I’d like to build – but I’m not sure I can really create and support the app across two platforms doing this as a side project (hobby).

Design

Ranger GPS Styles

My goal with Ranger was to create an app that was really good at one specific thing, instead of tying to be just OK at multiple things. With that in mind, I wanted to keep the interface very clean, simple and uncluttered. I also wanted the app to have a flat look, without a lot of textures or gradients.

The typography needed to look good in all caps, and I wanted it to have a condensed feel. Any icons created would be flat and simple, adding to the overall look.

I didn’t want to have a traditional tab bar because the core functionality would be contained on basically one view and I wanted to maximize the viewable area. With mapping and yardage being the primary elements on the main view controller, I tried to keep the nav bar as thin as possible while still providing easy-to-tap buttons.

The grey color was easy and I need to give my wife Andrea credit for the gold color. She said “… why not use one of the colors of a traditional tee marker, like gold.” I was sold.

The flat, simple design turned out to be a good idea. Apple’s new iOS7 UI is flat and Ranger will only require a few subtle tweaks to comply with the new guidelines and still support iOS6, which I will do for at least the next update or two.

Free, Paid, or Ad-Supported

Ranger iAd

Ranger is a free app and always will be. But, it didn’t start that way. Originally, I had planned to charge for the app. I didn’t plan on really marketing this app or trying to get wide-scale adoption, so I thought, why not charge $3.99 and if I sell 100 of them, great! But as I got further into the development process, I started to become interested in getting Ranger in the hands of as many people as I could, and going free was the only way to make that happen.

That said, I never gave up on the idea of making some money – even just enough to cover hosting – and decided to integrate iAd and in the future, an in-app purchase to remove those ads. I went with iAd because the integration was relatively straightforward. I looked into different ad platforms and the idea of having fallback ads when iAd doesn’t serve an impression (basically anywhere outside of the USA, UK, Spain, Australia and few other major countries), but that process would’ve added a significant amount of additional development and QA with a limited payoff.

Once I added iAd into the mix, it instantly added a few additional nights of development and conditional statements to the process. iAd requires that you not serve a blank ad impression. That means that I have to ensure there is an ad impression and show the ad, but be prepared to remove the ad if a future ad doesn’t fill. I need to be prepared to monitor the serving of ads even while on other view controllers and show/hide the ad appropriately. Failure to do this will almost certainly result in the app failing the review process. The code to do all this isn’t complicated, but testing each and every possibility was time consuming and made me wonder if I really needed to integrate ads to being with!

In a future update I’m going to offer an in-app purchase to remove the ads. The ad unit itself is only on the main GPS screen and is at the bottom. It really doesn’t interfere with the design or use of the app, but in-app purchases are where the app store $ are flowing and removing the ads will be the first in-app purchase Ranger will offer.

Apple Maps vs Google Maps

Ranger Location Services

This question required a lot of research and a pro/con list. When I started the development, Google had not officially released their SDK. Apple Maps was the only option, and MapKit wasn’t getting a lot of love. Because it was the native option, I could drop an MKMapKit onto the viewcontroller, wire it up, and I was good to go. I could focus on the more challenging tasks. However, Apple Maps, to be quite honest, doesn’t provide the level of clarity of Google Maps.

Midway through the development Google released their SDK and I was intrigued. I setup a couple of test apps and I liked what I saw. The clarity of the satellite imagery was much crisper, and since Ranger relies on being able to see the targets, that is very important. GMaps also allows the user to rotate the map with two fingers. That becomes very important when the targets happen to be heading any direction other than north. People like to view their map (and targets) the same way they are looking, which is straight ahead.

Apple Maps fell short in both of these critical areas. That said, those areas are “nice to have.” One of the requirements of Ranger is that a user could drag the target to any other location to find the distance. GMaps did not (and still doesn’t as of this post) allow users to drag a marker. As much as I wanted to use Google and have those beautiful maps and user interaction options, I had to go back to Apple.

I considered leveraging the Heading data point from Location Services, and rotating the map to match the heading. It is doable, but again, a nice to have feature. And with iOS7, I believe the rotation option will be included.

To date, Apple Maps has performed well. There are certain cases where the fidelity of the maps causes an issue, like with water-based driving ranges, but I can’t control (or test) for all those conditions. We’ll see what happens with iOS7.

Responsive Website and Twitter

iphone_three_hero_large

The last piece of development that needed to be done to create a solid app and support infrastructure, was a responsive website – http://getranger.com. Like I did for this site, I leveraged Zurb Foundation for the responsive framework. To go with the design of the app, I wanted to leverage a big visual, clean and simple design, and the fonts and colors from the app. The site is simple, but has the opportunity to grow.

In addition to the site, Ranger needed a Twitter account – @RangerGPS. As of right now, the account has posted mostly status updates about the process and a few golf-specific posts. I’m also using it to post screenshots of Ranger showing the distance to specific pins at major PGA Tour and European Tour events. Ranger isn’t the first to do this, but it is a fun way to promote the core feature of the product and provides a great reason to tweet on behalf of the app.

IN THE NEXT POST, WE’LL COVER THE KEY FEATURES AND RESULTS SO FAR. READ IT HERE >

I just wanted to jot down a quick note about this app because its about to transform the way I analyze my golf swing. Until now, I was using V1 Golf, an awesome app for iOS, and I’ve also been using SwingReader. Both are great for being able to add plane lines, check angles and control slow motion video of your swing …. at 30 FPS.

30 is great and all I needed, until I found SloPro. With the iPhone 4S, it captures true 60 FPS video and the playback is like butter. With this app, I’m able to see things about my swing that I haven’t seen before. Doubling the frame count really does matter! And if I want to, I can crank up the Slo Mo, to 500FPS or even 1000 FPS, which a few optical tricks of course. But even at 60 FPS, I’ll be able to look at my swing, especially key areas such as transition, with a new lens. Unfortunately, the hardware on the iPad just isnt there yet to truly harness this app, but it still works just with a little more trickery.

You can check it out here: SloPro – 60fps Slow Motion Video

I haven’t used the Swingbyte yet and its not even available to pre-order, but I haven’t been this excited about a new product coming to market since the iPhone. Launching in April, the $149 Swingbyte will transform the insight, analytics, and information you can get about your golf swing. Outside, inside, with your instructor, by yourself, even without a ball, this product just might give you the clearest picture you’ve ever had of your golf swing.

For me, this is an awesome use of mobile technology and captures my attention by blending my hobby/obsession for golf with my passion for technical innovation. Without actually using the app (man I’d love to have one in my hands right now) here is why I think this product will be a massive success.

A 1oz. sensor-packed product

The Swingbyte, a lightweight sensor that sends a 3D rendering of your swing and valuable data to your smartphone, was just announced at this years PGA Merchandise Show. For a $149, which is a little more than the price of a new wedge, you get analytics and insight into your swing that would cost you thousands of dollars with a bigger system or require you to take lessons on a Trackman or simulator. I think the price is perfect and any golfer serious enough to want this data will be able to justify paying this price.

I can only assume the array of sensors inside include at least a gyroscope and accelerometer. The sensors capture a ton of data and then wirelessly sync up via bluetooth to display the data on your iOS or Android device. The simple, compact package and wireless sync means you can use this anywhere without having to carry around a ton of gear.

Check out this video of a demo taken by Par2Pro at the merchandise show.

500 data points

The data is the primary reason I want this device. You get club speed, club loft, lie angle, and face at impact, attack angle and all your initial angles around loft, lie and face angle. The Swingbyte also delivers club path data including a written explanation such as “out-to-in” and you can see your swing tempo from start to the top and from the top down.

At the end of it all, the Swingbyte even presents the resulting shot shape. No more guessing. You now have proof and you also can start drawing connections between certain data points and their affect on your swing.

3-D Video of your swing

Swingbyte graphics are owned by SwingbyteThis is incredibly cool. The sensors are always on, which allows the Swingbyte to record the path of the swing and render a 3D animation of the swing path. Video can only show you so much and although apps like V1Golf and others allow you to slow the swing down frame by frame, I’ve always wanted to see the actual path of the club. In comparison to the backswing path, am I dropping the club down or coming over the top? From the front on, is my downswing path “inside” the backswing path, which would indicate I’ve made a good shift forward and I’m lagging the club. You can even see the overhead view. This is invaluable for analyzing swing plane to ensure that your swing is on plane and on a good path.

Inside, outside, even in your living room

Until now, the average golfer had to make a choice about how they would practice. Either choosing to work inside in a simulator (or in a homemade indoor range like me) or work on the driving range. The driving range obviously has the benefit of seeing how the ball flies and most closely replicates course conditions. Inside, the simulator shows you all the data about your swing and mimics the flight. The problem with the range, is that most people can’t analyze their ball flight effectively. The problem with inside, is that simulators are insanely expensive.

The Swingbyte solves this problem. On the range, you will have detailed stats and analysis about each shot allowing you to really understand ball flight physics by matching the data to the flight. You have the rich data of the simulator and the feel and visual feedback of real golf shots.

But, the real power is that you can use the Swingbyte inside and still have the same focused, detailed, feedback-driven practice as on the range. If you have a mat and net to hit at home, you now have data about your swing instead of relying only on the feel of a good shot. This is something I’m really excited about. You don’t have to guess whether or not the ball would hook, slice or fly straight down the middle of the fairway, you can see it right on your iPad. And you don’t even need a real ball. As you saw in the video, you can simply swing the club anywhere and have 500 pieces of data telling you exactly what happened. There is no such thing as a rained-out practice session.

Great for instruction – with or without a pro

I’m not working with an instructor right now – part of why I really want this product – but I’m working hard on my swing. When I do work with a pro, I prefer to work outside so I can see the ball fly. That said, I love the data of inside golf simulators. The Swingbyte creates the best of both worlds in a much less expensive package than a Trackman. Every instructor out there should pick up this product and add it to their lessons. In general, students want to spend more time working on fixing their swing than they do showing the pro their current swing. Instead of having to watch 20 or more balls fly and analyze it from every angle, they can see the data in real time on fewer swings, giving them a clear picture of the problem areas and more quickly work out a plan to address the swing faults.

If you’re analytical like me, the data available for every swing will help you make yourself better. Personally, I’m working on plane, more lag, and face angle. I’ve struggled with an over the top move and an early release. The data will help me determine what I’m doing at impact and the 3D animation will show me exactly what’s going on. This makes me my own instructor.

This product brings remote instruction into play. Having the data and 3D swing makes it possible to actually receive remote instruction. The problem with remote instruction in the past was that the instructor could not really see the swing. Even if they had a video, its usually only one swing shot on a smartphone with a max of 30 fps. But with 3D video of the path coupled with all those data points, remote instruction is now a reality. I’ll be interested to see how this plays out.

Availability

The company plans to ship the product in April, but an official date or even a pre-order date has not been announced. For $149, you cant find another product with this level of insight. I’ve read that they are including a year of advanced instruction ($49 value) but the details of that piece are limited. To be honest, I’m not as interested in that piece because I’m very analytical. But the idea of remote instruction is very interesting and many people will be very excited about that.

Bottom line

If the Swingbyte produces accurate results and lives up to the promise, this will be the biggest new golf instruction product of 2012 and beyond. Avid golfers, newcomers, and instructors alike will pick this product up and add it to their bags. For me and a few people I’ve talked to about this already, we’ll be pre-ordering the day it becomes a reality and until then, awaiting its release with anxious excitement.

For the first time, mobile users opened up native apps more than we used our mobile browsers. 44.9% of us used mobile apps compared to 44.4% of mobile subscribers that used the browser (I use both), according to data from comScore’s November mobile subscriber report.

I’m not really surprised by this report, in fact I’m a bit surprised it is still this close. For one thing, the two most popular mobile platforms are Android and iOS (75.6% of all smartphones) which are both app-friendly. And if we think through our own mobile habits, I bet the majority of us spend a lot more time in apps than in the browser. We all likely use at least one of the major social apps such as Facebook, Twitter, Path and LinkedIn, at least daily. How about Weather Channel to view the forecast, ESPN Scorecenter for sports, Instagram for photo sharing, Meebo for messaging, WordPress to write this post. I can already see that I likely use apps more than the browser.

But if I want to find information about something that does not fit neatly into one of the apps I have installed, I use the browser because its fast, reliable and easy. And I’m not alone. Google has seen a 400% increase in mobile searches this past year from fully featured mobile browsers.

That means if I’m interested in learning more about a company, the first place I’m looking isn’t in the app store where I have to search, find, install, enter my apple ID password and wait for it to download. The first place I’m going is google or directly to the company website.

Mobile Career Sites are the foundation

Its critical that companies today start thinking mobile first. But they need to be thinking about the right piece of mobile to put first. At Bernard Hodes Group, we believe the foundation of a mobile recruitment strategy starts with an optimized mobile career site. Having an optimized mobile career site allows your organization to tap into the widest set of mobile users regardless if they are iPhone/Android/Blackberry/Other users, granting them instantaneous access to your career information such as company info, events nearby, and “jobs near me.”

Here’s a quick example of creating a location-centric, app-like mobile site experience: Let’s say I’m in your retail store or walking down the street passing your building or standing in your office looking at an LCD screen promoting career opportunities at your company. I’m likely not going to spend 3 minutes or so to hit up the app store, go thru that process, then open the app, hit the GPS button to find my location, and then see job opportunities around me. But I might take 10 seconds to scan a QR code or type your site URL – or in the coming years leverage image recognition or even NFC – which will take me directly to your optimized mobile career site to pre-generated search results showing job opportunities for that specific location. In a few seconds and only a few clicks, I now have access to the targeted information I want and I didn’t have to download an app to get it. That is one simple example, but it shows just how powerful mobile sites can be at quickly delivering information.

Lots of new Smartphones, rich browsers

Smartphone growth is accelerating with smartphones accounting for 59% of all new phones sold. Over 6.5M were activated on just on Dec 25th this year. These devices have powerful operating systems and rich browsing capabilities. HTML5, while not perfect yet, allows us to create app like experiences for these devices by leveraging GPS to show “jobs near me”, advanced search, multimedia, cool gesture-based actions or transitions and more. And it will continue evolving over time.

In future posts, I’ll dig into the features and functionality of optimized mobile sites and also explore some ways that mobile apps CAN play a successful role in your mobile recruitment strategy. Apps definitely have a place in your mobile recruitment marketing strategy, but if you are just getting started and want to position yourself now and for the future, think mobile sites first.

What a year for golf. As I mention at the top of the Golf section of my site, this past year I got a bit obsessed with improving my game. I decided a couple things: 1) I needed a hobby 2) Golf was it and if I wanted to really improve and have a chance to hit great golf shots, I needed to devote myself to it now (while I’m still “young”). I started the year averaging an 18 hole score of 92-94 but easily shot 98 and 100+ rounds, too. Back in April I set a goal of breaking 80 by the end of the year.

It started with a playing lesson last Thanksgiving and I was hooked. I started watching the European Tour events on weekends, Golf Central at night, I set up a golf twitter list to follow the players, placed clubs around the house, bought books, set up a practice area in the garage, bought a swing app, devoted time to golf-specific fitness, analyzed the crap out of my own golf swing and the swings of pros, and hit a ton of balls.

The past two weeks I played 5 rounds and saw all the work over the past year really pay off. Although I didn’t break 80 this past year, I made some major improvements in my game. I went from a 19/20 handicap down to a low of 16 and settled at a 16.7 (17). I shot in the 80s 3 out of the last 5 rounds going 85,84,83. My confidence is up, I’m hitting some great golf shots and I’m excited to see my game improve in 2012. Like I did throughout the year, below is my year-end wrap up of golf game.

The start of the obsession

As I mentioned, it started with a playing lesson down at River Strand in Florida. I can link a lot of my obsession to that amazing course. 27 holes + an outstanding practice facility. Every time we go down there to spend time with family, I also get to feel like I’m transported to a golf camp where I can put in some work on my game. I’ve had an interest in golf for a couple decades, but never played more than a few times a year. After the playing lesson I decided to change that.

When I started, my swing was homemade. I thought like everyone else that you need to scoop the ball to get it in the air, that your arms and shoulders do most of the work, that taking a divot behind the ball was just fine (the pros take divots so whats wrong), and that I’d never ever hit a draw. EVER. Its not that my swing was terrible. It looked fine. But I came over the top, I was all arms, I was disconnected, I didn’t use my body, I didn’t lag the club, I didn’t have a consistent setup and routine. I actually had more of a stack and tilt swing. Basically, I was a weak, push slicer and when I really tried to get into one, I pulled the ball. Forget talking about course management or short game or confidence. I was like the majority of golfers out there shooting in the mid 90s.

But if I’m gonna to do something, I’m gonna try to do it the right way. During the playing lesson, I started to see how a good posture, bringing the club down the line and not inside and trying to drop the arms, will really help the golf swing. And, I decided I’d do it mostly alone without an instructor.

Learning about the golf swing

Hogan and Davies Golf BooksBeing analytical, I decided that I needed to know the mechanics of the golf swing. I started by picking up the golfers bible – Ben Hogan’s Five Lessons. This book lays out the five main parts of the swing from the grip to the follow-through. It talks about the feel of each step, illustrates the position of the hands, arms, etc. and lays out suggestions for how to improve. Hogan even mentions that if you follow his routine and practice, you can break 80 in 6 months. I kinda took that on as a challenge. I read his book cover to cover a few times and referenced it almost weekly throughout the year. It gave me the kind of knowledge about the swing that I needed to understand why your arms work a certain way, why the ball reacts a certain way and helps me every day.

I also read and watched anything golf related. I picked up a couple other books – Hank Haney’s book was one of them – and read every instructional article in the magazines I subscribed to. The 7 nights at the academy special golf channel ran last year was awesome. I taped and watched them over and over. I also looked at slow motion video of pros. I’ll get into that later.

Practicing

For the first half of the year I spent time at the driving range. Lots of time. My rewards card got up to a point where I could play 3 rounds of golf for free. I didn’t start keeping track of my progress until April, but up to that point, I was learning and reading and trying new things. I prescribed to the Hogan methods religiously in the beginning. I was also swinging the club and working on grip and posture in the middle of the living room.

Real Feel Golf Mat and Bridgestone practice ballsBut then I realized that going to the range at night and on the weekends all the time, still didn’t give me the opportunity to practice as often as I wanted to. In June I bought the Country Club Elite golf mat, which is one of the best golf mats you can buy to simulate real grass. The mat is thick and unlike other generic mats, allows you to hit down on the golf ball. You know if you hit it fat, thin or perfect. I set up a hitting area in the garage that can be quickly set up and taken down. At that point, I started hitting balls almost every day and the mat paid for itself in a week.

I attacked my practice sessions with purpose, hitting 100 or so balls a night, but working on specific aspects of my swing. I also purchased recycled Bridgestone balls, the same balls I use on the course so the feel would be consistent. Since I wasn’t working with an instructor, I needed a way to tell if I was doing it correctly. In the garage I only have feel, sound and 7 feet of ball flight, so I needed video to verify if what I felt was actually a good swing.

I downloaded the V1 Golf App and fell in love. It was a simple interface to capture swings in full speed and then allow you to go frame by frame. I used my iPad and iPhone to capture the swings. I probably have over 150 swings loaded, but recorded over 500. I would swing a few times, watch it, tweak my swing, record, watch it. Over and over. It was invaluable to my learning. I’m looking at a new app that allows me to take FO and DL video simultaneously, which would be cool in 2012.

Swing changes through the year

Year end swing comparisonI changed my swing a bunch this year. So many times that Andrea uses it against me now when I get upset at my progress. Early in the year I was a devoted Hogan follower and to a certain extent I still am. How could you not be. But I took it too far in some places. I had a very flat backswing in the early months and really fired my hips back. Hogan stressed firing those hips and that they can’t go too fast. So i did. But that caused timing issues. Then I moved to a more up right swing, but that caused me to go over the top even more.

I adjusted my posture. At first, I was narrow. I felt I had better contact and up until Jun, I was hitting balls with a more narrow stance. But I was leaning my shoulders toward the target on the downswing. All that did, was make me unstable. In the summer, I moved to a more stable posture, wider base. I was hitting awesome golf shots. I was moving my left knee out over my left leg to initiate the downswing and I looked great. Then I had someone I trust look at my swing (via video not live) and they suggested I bend more from the hips. Well, I did and I bent too much. It took me 2 solid weeks to reshape that swing and posture. By the time I arrived in Florida at the beginning of November for a quick weekend away, I had grooved what I thought was a good swing.

Swing evaluation at GolfTec

I’m not sure why I didn’t do this earlier. GolfTec has an awesome setup. You get rigged up with sensors on your hips, shoulders, back and everything is wired together with video to analyze your swing at every stage. I took some swings and then had an hour long discussion, going over the numbers and video. What I found out changed the way I looked at my swing and finally put me on a path to the swing I’m going to have in 2012.

We noticed I was WAY too bent forward, which was likely causing my back issues. We also noticed that my right foot comes up off the ground too much, that my club isnt lagging enough and is kinda casting and that my hips are spinning out way too fast. He gave me a couple of drills to help my posture, and a bump and pump drill to work on bumping the hips left and pumping the arms down simultaneously. We shortened my backswing, too, to keep it compact. This synched up my body and arms and completely changed my swing. After the eval I hit balls on the range and had never hit them that well. I had a smooth shorter swing, that produced a draw. I used it throughout the weekend, hitting some beautiful golf shots until my left hip was so sore I couldn’t really use my legs well and the swing kinda fell apart. But it proved I was on the right path. And whats funny, the path is closer to the swing I was doing in June than the swing I had when I arrived in Florida in November. I should’ve stuck with it.

Using golf to stay committed to fitness

Over the past year I got more dedicated to improving my fitness. I needed to for my health, but I used golf as the motivator. I bought Craig Davies book Golf Anatomy, which breaks down the muscle groups and their function in the golf swing and also lays out 70+ golf-specific exercises for everything from Stability/Mobility to Strength and Power. I read the book and used a few of the exercises in my workouts, but it wasn’t until after Florida in November, that I decided to create a full plan.

When I saw how weak my legs were, I decided that I needed to take a few weeks off from hitting balls and focus on working out. I put together a multi-day workout plan that consisted of strength and power days, mobility and balance days, as well as flexibility. I focused on explosive power moves for my legs and developed circuits to get me through the workouts efficiently. What a huge difference I am seeing already. My legs are more powerful and do not get tired or sore as easily, I have more stamina during a round and I just feel better. And we’re only 2 months into it. Fitness will play a big role for me in 2012.

Choosing a better ball

Bridgestone e5 and B330-S ballsI decided that if I was going to devote a lot of time to my swing, that when I get on the course I need to be prepared and that means choosing the right ball, staying hydrated and fed, and just making sure that I have all the tools I need on the course. I know I’m not a PGA Tour star or hell, even a mini-tour player, but golf is a mental game and its a fun game and being ready to play is important.

It started with the ball. I’ve always tried to balance cost with playability. At the beginning of the year I played Callaway Big Bertha Diablo. Sub $20 ball. Then moved to the HX Diablo, a Golf Digest Hot List winner. Its a distance ball and a good one. If you want more distance you need that ball. But during a playing lesson in July in Florida, Corey Pion taught me a knock-down shot from 65 yards out. The shot was designed to generate spin on the ball, bounce check once and stop. By change, I had been playing a Bridgestone B330-S, probably because I lost all my Callaways. I hit the shot perfectly, it bounced, checked and even spun back slightly. It was awesome. At that moment, I realized the value in playing a ball that allows for control around the green.

I researched my options and with the help of Golf Digest’s Hot List, I found the Bridgestone E5’s. A two piece ball but with a urethane cover like the tour balls. The E5s (a sub $30 ball) almost the same level of spin as some of the $40+ tour balls. I bought some and was instantly sold. I was able to put spin on the ball and get them to check on the green AND I didn’t lose any noticeable distance. The ball flight was penetrating and the balls just landed soft and stopped.

This past trip to Florida I found some Bridgestone B330-S on sales for only a couple bucks more than the E5s, so I tried them. And wow, I thought the E5s had a ton of spin, these are insane. I know my swing is even better now and I’m hitting down on the ball, but I had some shots where I was actually able to watch the ball hit and spin backwards. Even off the green in some cases. I don’t know that I’ll continue to use the B330s until I get ot a point where I only lose 1 per round, but its an awesome golf ball.

Switching the shaft on my driver

Aldila Shaft for my driverMy driver has always been a sore subject. If I hit it just right, I could get 250 or 260. But it was so hit or miss. For most of the year it was due to a bad swing. The over the top slice swing. But as I started to get my irons more solid I still struggled with the driver. I decided that I would get a new one at the end of the year. I had hit a few drivers during rounds, such as the Diablo Octane and the Titleist 910 D2. Gorgeous ball flight and 275 yards on some shots with those clubs. But as it got closer, I didn’t feel my swing was where it needed to be for me to want to get fit for a new driver. So I investigated changing the shaft.

Up until the point I did my research I had no idea how huge an impact a shaft made. When I looked into it, I found out the shaft on my driver was made for Senior/Lady swing speeds. Lady! I called Edwin Watts and they said come in and hit a few balls on their simulator and they would recommend a good shaft. When I hit a few, Jason looked at me and said “Your swing speed is 115 mph…. you should never be hitting a Senior flex shaft, you need an X-Stiff shaft.” They had one in the back, Aldila NV 75 X-Stiff. Installed it for me and was ready the next day.

When I started playing with it I instantly realized I had been making this game harder on myself. I was crushing the ball, with nice lower flight, great hang time and shots that tracked 275-280 or more in some cases. And not a single slice! I hook the ball a bit now and I certainly push it, but thats swing stuff, not shaft stuff. My confidence with this club is off the charts right now and I can’t believe I waited as long as I did to get this fixed. I’m marking more ‘Long’ fairway stats on my cards than ever before, something I need to fix, but still very cool.

Staying hydrated and fed on the course

Nuun electrolyte tabletsStaying hydrated and fed on the course is important. Yes I like to go out and have a beer on the course, too, but especially on hot days, I like to drink a lot of water. I tried Nuun tablets earlier this year on a trip to Florida in the middle of the summer and they were amazing. No issues all week. Easy to use, they dissolve in minutes and taste good. I use them during the week and when I’m traveling, too. They have a much better taste than Gatorade or some of the other sports drinks and you can easy drop a tube of them in your bag.

On the course I also started bringing out Lara bars and bags of mixed nuts. I was really surprised to see how much better my game was late in the round when I started to bring these out on the course. I’m sure some of it is mental, because I feel like I “need” these out there now. But good protein, hydration and energy during a 5 hour round is pretty important.

Grooving a swing and getting confident

This last trip to Florida over the Christmas break was the best golf I’ve played. I had a quick lesson with Corey on Friday before my first round and he gave me one of the greatest tips for a pre-shot… pumping the arms down twice and then swinging through to a full low release. I used it many times since. He also looked at my swing and confirmed that my new posture and swing was looking really good. Posture was great, tempo was really good, I’m coming inside straight inside now and I’m balanced. Couldn’t have been better for my confidence.

I played some really great golf over the weekend. It was fun to be able to hit some pure shots, feel the ball hit on the middle of the club then feel it dig through the turf, chunks of beautifully manicured turf flying as I watch the ball jump of the club, climb, draw a little right at the flag, hit once then stop cold. Watching some of my drives fly 275-280, straight down the fairway with a hang time that allowed me to pick my tee up before it hit the ground, that was awesome. Just feeling more in control with my swing and my game and having the confidence to play good golf. I no longer worry about water or hazards. I know they are there and I try to avoid them. But I don’t fear them. I can pick my target and hit my shot. It doesn’t always go where I want it, but I have the confidence to try.

Goals for 2012

Continue to make progress each and every day. Breaking 80 is still a goal and one I want to achieve very soon. By the end of the year I want to be a 12-14 handicap golfer and depending on how much I play, I really want to be a 10 by the end of the year. But that means I have to play a couple times a month.

I want to continue to dedicate time to fitness and really stay committed this year to better health, which will help my game. I want to build on the consistency of the end of the year and start hitting more GIR and more fairways. I need to work a lot on putting. Eliminated 3 putts (and penalties) this year is the only way I will break 80. You can’t break 80 and 3-putt.

I plan to build a practice schedule that combines strength training with indoor practice during the winter. I’d like to play golf or go to the driving range once a week and I will devote time to putting inside and chipping in the backyard.

But most of all… this year is about getting my mental game sharp. I get way to frustrated with myself. My expectations take over and when I have a bad hole or a bad shot, I get really down on myself. I need to recognize what I did wrong and let it go. I’m not getting paid to play, I pay to play and I need to stay serious to improve, but I need to have fun. If I do that, I will be able to recover from bad shots easier and that will help my scoring.

I couldn’t be happier with the work I’ve put in and the results I’ve seen this year. My improvement from the beginning of the year to now is pretty substantial. You can see in this one side by side shot above that just in the last 6 months, I have made major changes to my swing and my ball striking reflects that. Its looking like a fun year of golf ahead in 2012.

I don’t know if this little guy helps me play better or not, but having a little Westie headcover on my bag now is a lot of fun.
Westie Headcover

Lab Dreams to Real Solutions @ LinkedIn HQ

I was honored and excited to be asked to lead a session at the May 2011 Recruiting Innovation Summit at LinkedIn HQ.  ERE (and specifically @TheLance) put on a great summit and all the presentations brought exciting and thought-provoking ideas the attendees.

I enjoyed putting this presentation together and had a blast presenting with Tomya Ryans, who shared some dynamite thoughts and answers during Q&A.  If you couldn’t attend or just want to review, here is an overview of the session Innovation for Digital Talent Acquisition: From Lab Dreams to Real Solutions.

The theme is taking ideas from the lab into real, live solutions.  Instead of only talking about high level concepts, we actually walk thru what we can create and the “why” behind what we wanted to do.  Four distinct areas are covered:

  • Personalized Candidate Experience
  • Facebook Innovation
  • Mobile Innovation
  • Live Twitter FAQ
Personalized Candidate Experience

There are three things we know: 1) A massive number of people have LinkedIn and Facebook profiles. 2) Internet users are becoming more comfortable with the idea of “logging in with your social profile.” And 3) the data in those profiles contains a goldmine of information we can use to create personalized experiences on career sites that are tailored to each visitor’s individual work experience, education, skills, location and more.

Let’s leverage that information intelligently and start offering visitor’s job recommendations, talent areas, content and more, based on their OWN profiles and not simply generic hot jobs or opportunities. You can see this concept in action by going to http://tmobile.jobs and clicking on “Job Recommendations for You.

Facebook Innovation

We talked about two concepts in this section: Personalized Custom Sections and playing in the stream on Facebook. We’ve all seen beautiful custom sections and we’ve seen not-so-beautiful custom sections on company Facebook Pages. What we haven’t seen much of are sections that leverage social profile data. Custom sections can allow user authentication in the exact same way as Facebook Applications. Instead of simply presenting the same info to all users, allow them to authenticate the section and then personalize the experience by leveraging their location, work history or any other piece of their profile.

Shameless plug: The Innovation team @ Hodes created The Instream Jobs Facebook App to demonstrate how companies can “play in the stream” more intelligently and we demo’d it live. The app transforms traditional wall posts about job opportunities by posting a dynamic, branded application with full job details that keeps the user on Facebook instead of forcing them to leave. Instead of basic text and a link, this app allows the branding, company info and job details to show up in the newsfeed of people who Like your company. It doesn’t have to be just be jobs (and it doesn’t have to be our app), you can play in the stream in a number of cool and interesting ways.

Mobile Innovation

I’m going to sum up the mobile innovation section quickly … now is the time to mobilize your recruitment strategy. If you need some supporting stats, check out the first slide in this section, it should be all you need. Since we know our mobile phones are personal and what we do with them is social, let’s start personalizing the mobile experience by leveraging social data. Mobile is about utility and this concept packs a ton of utility.

This section also covered integrating Twitter and Foursquare to build interesting mobile event pages, and creating unique search experiences by leveraging Augmented Reality. There is so much to be done, so much to talk about when it comes to mobile recruiting, that we could spend days talking about it.

Live Twitter FAQ

The last section was more of an experiment than anything else as we discussed using Twitter to replace live FAQ pages on career sites. To demonstrate the concept, we asked everyone to use various hashtags thru out the presentation when they asked questions. During the Q&A, we pulled up a live demo of what Twitter FAQ pages might look like packed with actual audience questions and answers. Showing job seekers information asked and answered by the community of job seekers and company brand ambassadors – instead of static, old info – has the potential to really showcase (in a good way) what life is like inside your organization and attract the calibre of candidates you’re looking for.

Slides and Video

Below is the deck and video from the presentation. The video includes live demonstrations of all the products/concepts in the presentation. If you have any questions or just want to talk more about any of the concepts presented, I’d love to hear from you.

If I say the word “Azalea” or “Dogwood” or “Magnolia” and you immediately think about The Masters and Augusta National Golf Club, then download The Masters iPad App ($1.99 iTunes link). Before I start into this, if you don’t have an iPad, check out The Masters Website because many of these features, such as Live Video, are available on the site.

The Masters week is one of my favorite weeks of the year and when I downloaded the app over the weekend I knew it deserved more than a tweet exclaiming “dude, you gotta download this app.” If the only features were live video of Amen Corner and a live Scoreboard, I still would have paid for the app because that means more access to The Masters. But, Augusta National and the developers got it right and this application is so much more. Even before the first ball is struck on Thursday, there are over 29 high quality videos, 60-70 news updates, a scrolling timeline, stunning course photos, players info, and live video of players on the practice range. All week long, if I’m awake this app will be on.

The Course

If you’re not one of the lucky patrons able to walk the beautiful Augusta National Golf Club, then “The Course” section of the app is worth the $2 on its own. One of the greatest uses of the iPad is watching videos or viewing photos on its crisp and vibrant 9.7 in. screen and this application takes full advantage. All 18 holes and every major landmark – such as the Hogan Bridge – are presented in full screen photos and with an update sometime this week you will also be able to view 3D flyovers. Click on a hole and you see information about yardage, par and its name such as Azalea, Flowering Peach or White Dogwood. And in the background the screen is filled with brilliant images from the course that make you feel as if you were standing there thinking about which club to hit into the 13th green. Unless you are actually walking the course, these photos allow you to experience Augusta National in a way that even television fails to do sometimes.

Players

The Players section is what you’d expect out of an app like this. It takes advantage of the large screen real estate and presents a list of players alphabetically on the left and a large player card on the right. The player card contains a live scorecard with position, status and current hole information clearly presented, a brief bio and then a range of stats from Best Finish to Money Won. And the best feature here is that you can easily add them to a Favorites list which is part of the personalization options available within the application that allows you receive push notification alerts throughout the tournament.

Video and Updates

There is so much content packed into this app that you really need to download it today to give yourself a couple days to consume it all. There were 29 videos posted when I started writing this post and now there are 31, so that gives you a good idea of how often the app is updated. You can filter video by day or by player and they include videos about the history of The Masters, key features of the course, a series on Masters Greats, and highlight videos.

The Live Updates section currently has posts about general updates, the players added to the invite list (there are only 99 players on the list) and who is currently on the course playing practice rounds. But I imagine as the week goes on the updates will become more frequent and more engaging.

Timeline

This is another feature that takes full advantage of the large touchscreen to present us with a timeline that we can slide left and right (as you would expect) and is packed with photos, videos and information about key dates in Masters History. The timeline starts in 1931 with the purchase of Fruitland Nurseries as the site of Augusta National Golf Club and continues through history all the way up 2010 and the first 3D broadcast. Golf fans, history buffs and people who don’t like sitting through commercials with nothing to do will truly enjoy this feature. Though I should note that Augusta National actually limits commercials to 4 minutes per hour, so its pretty much non-stop golf starting Thursday.

Live Video Channels

I completely agree with the advice to “start and end with the best.” There will be 9 live high-definition video channels included in the app this year. As I’m writing this, I have the Masters On the Range channel up which includes live video of the impressive Practice Area and interviews with players. Monday, Tuesday and Wednesday will include On the Range coverage, with Wednesday also airing the Par 3 contest at 3:00pm EST. Come Thursday and the live channels kick into overdrive starting at 10:45 am with Amen Corner, then Featured Groups, holes No 15 & 16, and the live TV broadcast.

Its not a secret that I’m completely obsessed with golf. This year I have a goal of breaking 80 (lately I’ve been 87-94) which means I’m reading a lot, going to the driving range, and watching lots of golf. I love it when I get shots of players on the range because its interesting to see how they practice. The live video On the Range is perfect for that because its up close and personal with these guys on the range. There is even commentary and slow-motion analysis of their swings, which I know other golf fans will truly enjoy. Again, if you’re not sitting in the gallery behind the practice area, this is the next best thing to being there.

Wrap-up

Spring is here. I don’t care what the weather is like outside, its Masters Week which means spring is here and The Masters iPad application is a must have for golf fans this week. Download it, prop your iPad up on your desk and enjoy Masters Week.

Look at that, I just wrote the first words of the first post on a site that has taken me almost 3 years to take live. It hasn’t taken 3 years because of some highly advanced code magic going on in the background (this is a hosted WordPress site), its taken me 3 years to start writing because I kept finding excuses .. and because I had a “Coming Soon” page.

I had an idea that I’d use the coming soon page as the basis for my first post. I would poke a little fun at myself for putting up a coming soon page that stayed live for years, show off some great coming soon pages (and coming soon themes for WordPress), and write a little about why simply putting up a coming soon page won’t automatically translate into crazy buzz about your product, service, blog or hot startup. But then I went to SXSW Interactive and got completely amped up.

Insights, networking, energy and inspiration

This was my first year attending SXSWi and I couldn’t be happier with what I got out of this conference.  I went through a range of emotions from excitement to exhaustion and inspired to totally energized.  I’m walking away from this conference with new connections, new ideas, and a refreshed and renewed excitement about my role.

I’ll admit, I got overwhelmed in the middle of the conference.  I had downloaded the SXSW Go app (awesome), plotted out my schedule and backup schedule, and coordinated with colleagues I wanted to see.  Some of my plans worked, many of them didn’t and that is one of the coolest aspects of SXSW… your plans will change but you’ll never be without something to do.  I ended up in a couple of sessions that were on my list as ‘plan B’s’ but turned out to be some of the best sessions I attended. Some of the highlights?


For me, I was blown away by Gary Vaynerchuk‘s talk The Thank You Economy.  His passion, excitement, and approach was refreshing and invigorating.  As I was walking into the session he was standing outside shaking hands and thanking everyone for coming.  I totally dig that.  He wasn’t just putting in time, he was locked in when you were shaking his hand and you genuinely felt he was thankful you came to hear him talk.  And this is a guy with almost 900k followers on Twitter and a 10 book deal with HarperCollins.  The official SXSW video doesn’t seem to be up anywhere yet, but you can find video here and I would highly recommend picking up his book The Thank You Economy.  I could write a whole post on why his talk was the best of SXSWi, but all that really matters is I left his talk so energized and inspired by his approach, outlook, and attitude, that all I wanted to do was go back to my hotel room and work.

Robert Brunner’s talk on Designing Ideas Not Objects was a refreshing and creative talk that navigated through Brunner’s work and philosphy around industrial design.  The talk was captivating, his presentation style was relaxed, and his slides were dynamic and full of photos and video.  I highly recommend checking out this gorgeous CGI-packed video his company produced for the launch of Kohler Karbon.  Brunner’s talk was also full of one-liner gold such as “be yourself, just be a good one” and “it doesnt work to wrap a story around a bad idea.”  For me, I wanted expected to see a session like Brunner’s.

There were other great sessions as well including Location, Location, Location, Designing iPad InterfacesAll These Worlds Are Yours: Visualizing Space Data, and other keynote presentations.

This site and what I’ll write about

Since I’m riding a serious high right now, I decided to delete the coming soon page and just get started while sitting in the AUS airport waiting on my flight home.  I didn’t ultimately post on that day, but this is the post I wrote.  So what am I planning to write about?  Emerging technology, mobile, beer, social, golf, and anything else that makes sense to write about.  I don’t want to lock myself into writing about any one particular topic, or promising to write a certain number of posts per ____ fill in the blank.

The biggest motivator in starting to blog is a selfish one.  My day-to-day role requires that I’m always thinking of new opportunities to leverage digital technology and I can’t do that if I don’t read a lot, think a lot, and test a lot.  And part of that process includes simply getting ideas out of my head and seeing how they sound.  That means I might write some stuff that seems incomplete, sounds ridiculous, or just plain doesn’t make any sense and I’m cool with that.

I’m also going to bring some ideas and testing of new tools into this site.  For example, the about page will leverage the LinkedIn API, pulling my profile and reformatting it a bit, and in the future will do some other cool things around data visualization.  The Work page uses the new Custom Post Types feature in WordPress 3.1 and the Updates section in the sidebar leverages Twitter’s new Web Intents, a feature we just might be rolling out on client sites if the tests go well.  I’m ditching traditional commenting for Facebook commenting (a test and see sort of a thing) and planning to have a tab-optimized experience once I have more content, might bring in SMS, LBS and more, too. And no, every post won’t be this long.

One of the biggest reasons Vaynerchuk’s talk resonated is that he was genuinely thankful for every person who came out to hear him speak.  He’s genuinely thankful that people watch his videos, download his apps (check out Daily Grape, btw), take the time to interact with him, and genuinely thankful he get’s to do what he does everyday.  He’s said it before, that if even one person finds value in what he has to say then its worth it and he will give 100% to even just one person.  I feel the same way.  I love what I do and I’m fortunate to do it.  If I’m the only one to read my posts, thats cool, but if even one person finds value in what I’m writing, I’ll be thankful and continue to be excited to keep doing what I’m doing.